Simple DIY Car Maintenance
Before we review these simple DIY car maintenance procedures let's talk about some things that aren’t included.
An obvious choice for this list might include the standard lube oil and filter service. However, not all automobiles make this simple DIY car maintenance easy.
German automobiles like BMW and Mercedes-Benz turn what should be an easy thing into a nightmare on some models. The newer BMW cars don't even have a dipstick to check the oil level.
There's two more points to make about why we left the basic oil change off of this list. If you go out and buy the oil and filter you'll probably spend as much as you would if you had the service performed at most chain auto repair shops.
In addition, when you do it in your driveway, you must dispose of the waste oil. You also run the risk of a spill in the driveway.
This makes you sorry you decided to do the service at home. With that said, when a retail auto repair center performs this scheduled maintenance you need to make sure they performed correctly.
Take a look at this article that covers what happens when an oil change goes bad. More importantly, that article covers how to verify they did it correctly before you leave the facility.
The simple DIY car maintenance items included in this brief article share one thing in common. The procedures suggested remain fairly simple across all year, makes and models. Nevertheless, you might find a few exceptions to this golden rule.
 Simple DIY Car Maintenance
However, read through these items and consider if they fall within your level of skill.
If you take these basic services away from your trusted retail auto repair center you'll save time and money over the next year.
If you're looking for additional items to add to your repertoire, take a look at this post covering additional automotive DIY maintenance items.
Car Battery Maintenance Procedure
Car batteries can last for a long time if you take care of them. How long can they last? I've seen The AGM (Absorbent Glass Mat) battery remain in service for seven years.
Even the cheapest lead acid battery can run for 3 to 5 years of solid service. The first thing we have to do is keep the terminals clean and protected.
Always wear protective gloves and safety glasses when working around car batteries without exception. Look for corrosion buildup that usually occurs on the positive terminal.
Spring into action and remove all corrosion and apply a protectant to both terminals. This assures all of the charging power from the alternator reaches the battery itself.
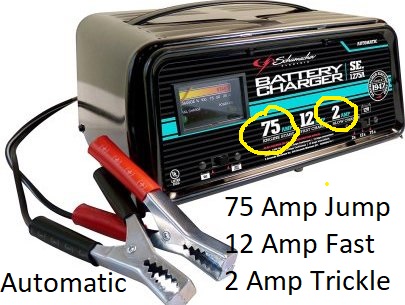
 Automatic Car Battery Charger
I provide an in depth article with pictures and tips about the procedure. Developing good habits when it comes to car battery maintenance protects both the battery and the alternator.
We have another item to cover when it comes to simple DIY car maintenance pertaining to the battery. A charged battery is a happy battery.
People constantly charge their cell phones, but they never think about charging their car battery as a preventative maintenance regiment.
The necessity to charge the battery in an automobile relies heavily on driving habits. If you drive your automobile long distances on a daily basis the alternator takes care of this for you.
As an example, a 30 minute trip to work five days a week allows enough time for the alternator to charge the battery fully and keep it that way.
However, many use the automobile for short trips with a run time of less than 15 minutes. Starting and running the car in this fashion leaves the battery below the ideal charge level.
In fact, operating the vehicle this way for months on end could mean the early demise of this electrical energy storage device.
With that said, if we hook up a battery charger and bring it to its maximum charge level on a quarterly basis we extend the life and the reliability.
If you're not going to give your alternator enough time to charge the battery, then connect a device that does it for you. When it comes to purchasing a battery charger there’s lots of decisions to make.
To make a long story short, I'm just going to point out the things that I want to see in a standard automotive battery charger.
The first thing is that I want to be able to jump the car with the machine if I need to. This requires at least a 75 Amp jump start function.
In addition, I want a fast charging rate of 10 Amps or more. This brings a battery to full capacity within 4 to 6 hours.
Finally, I want an automatic function with a trickle charge of around 2 Amps. This lets me leave the battery connected overnight without worry of overcharging it.
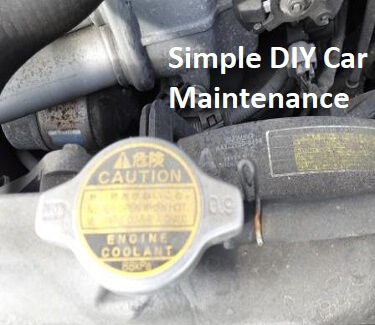
Why do a Coolant Drain and Fill
Believe it or not, a coolant drain and fill falls into the parameters of simple DIY car maintenance. Before we get into the procedure let's talk about why we would want to perform this operation in the first place.
It's true that most automobiles built from 1996 to present day include extended life antifreeze. With that said, extended life doesn't mean it lasts forever.
As a professional mechanic I can tell you many cooling system problems develop from antifreeze that's been in service too long.
What happens is the engine coolant loses its pH balance and starts to turn acidic. They make test strips for you to dip into a cold radiator. You can buy these or just change your coolant as per the manufacturer's guidelines.
On General Motors automobiles from the mid-90s the general service guidelines remain at the 10 year or 100,000 mile marker.
I cover additional services recommended at 100,000 miles. If you let the antifreeze go past this point it starts to eat away the cooling system from the inside.
You'll experience an accelerated failure rate of the rubber hoses, water pump and the freeze plugs when you fall behind on coolant maintenance.
Engine Coolant Drain and Fill Procedures
Radiators have a drain plug at the lowest point. You always perform this service on a cold engine. If you leave the radiator cap on and loosen the drain plug first, coolant flows out very slow.
This gives you time to adjust to drain pan. You can then loosen the radiator cap and control the draining flow rate. Give the radiator some time to drip dry.
Next you close the drain valve. Refilling the radiator is where some people will run into trouble. A reliable way to make sure you put the right amount back in is to measure the amount you took out.
However, to avoid this you just need to have some patience. Refill the radiator and let it settle and then top it off. Next you close the system by installing the radiator cap.
Then you run the vehicle until the thermostat opens to allow the coolant to flow. The next step is where the patience comes in and must be observed.
You let the car slowly cool off naturally. During this contraction process it pulls the reserve antifreeze out of the overflow reservoir.
Ideally you would let it sit overnight and then refill the coolant reservoir in the morning. This procedure burps the air out of the system.
Scheduled Brake Fluid Maintenance
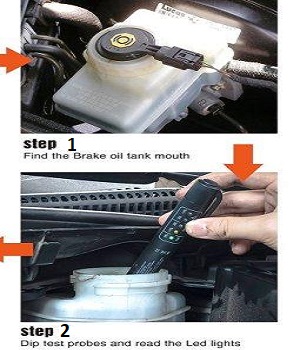
 Brake Fluid Tester
Even automotive enthusiasts that keep up with their tune-up and car maintenance problems can forget scheduled brake fluid changes.
When the fluid turns bad it can eat away at the delicate rubber seals throughout the braking system. In fact, one of the reasons that the fluid changes from a clear honey color to a dark color is the rubber disintegrating into the fluid.
Another cause for the fluid to darken is moisture intrusion. When it comes to scheduling brake fluid maintenance you should really follow your manufacturer guidelines located in the owner's manual.
Not all cars have the same hydraulic brake fluid installed from the factory. I'm shocked that my 2013 Infiniti M37 came from the factory with DOT 3 brake fluid.
Many General Motors automobiles now ship with DOT 5 synthetic brake fluid. Obviously DOT 3 and DOT 4 automobiles require more service in the brake fluid department.
Simple DIY Car Maintenance Brake Fluid Service
Do I really need to change this remains the first thing to consider when it comes to brake fluid service. Some manufacturers are hypersensitive to the intervals at which they recommend replacement.
Fortunately, they make a simple testing device that dips into the fluid reservoir. It measures the amount of moisture that infiltrated the brake fluid.
Moisture is the number one enemy to the inside of your hydraulic braking system. They design some brake fluid testers for certain kinds of oils. I prefer a tester that covers DOT 3, DOT 4 and DOT 5 brake fluids.
You can grab these simple battery-operated devices for under $10. However, the one that tests three different kinds of fluids will usually cost a few dollars more.
If the reserve fluid passes the test, leave it alone. If it fails, I recommend changing the brake fluid. The problem with changing the brake fluid becomes the need to bleed the brakes after the service.
Even small amounts of air can make a big difference in the way the brake pedal feels to the driver. Professional mechanics working in an automotive retail environment use a vacuum machine that literally pulls the new fluid in without letting air in.
So how does this fall into the simple DIY car maintenance category? A large percentage of the vehicles total brake fluid resides in the brake master cylinder.
On many models the reservoir holds more than half of the total hydraulic oil. Owners can use a simple hand pump to extract all of the fluid in the reservoir. Then refill it and run the automobile for a couple of days and repeat the service.
Depending on the size of your reservoir you will have completely changed the fluid after several cycles.
I've performed this service using a kitchen turkey baster. However, you can find automotive fluid extractors in the $10 range designed to do the job.
A few things to note about performing this service yourself. Brake fluid is corrosive to automotive paint. Protect the automobile before you remove the fluid.
Always wear safety glasses and gloves. Hydraulic oil becomes a maintenance item because it absorbs moisture. You want to use replacement fluid from a well sealed container if not brand-new.
Keep the time that the master cylinder cover is off to a bare minimum. Dispose of the old hydraulic oil in the same manner that you dispose of used engine oil.
Author bio : Mark is a retired ASE certified master technician, Chevrolet Professional Service Council member and the founder of FixMyOldRide.com. Watch the video on the about Mark the mechanic page to see his credentials. Mark hand writes all of the articles on FixMyOldRide.com unless indicated otherwise.