Rebuild a Carburetor or Replace it
Should you rebuild a carburetor or replace it? When people figure out their carburetor is causing problems they might think they only have two choices.
These options include a brand-new part or one that’s rebuilt. In this article we're going to talk about a third possibility that few realize is an option.
What if I told you rebuilding your own carburetor and keeping the original equipment with the automobile is the way to go.
This can be a big deal for automobiles considered collectible classics or will be someday. With that said, rebuilding your own parts can also be the cheapest way to a repaired vehicle.
Quick Links: Carburetor rebuild kits for popular models.
Take a minute to watch the time lapse video of an actual carburetor overhaul on a 4 barrel Holly at the bottom of this page.
Join me as we dive into why you should consider a rebuild operation instead of replacing it.
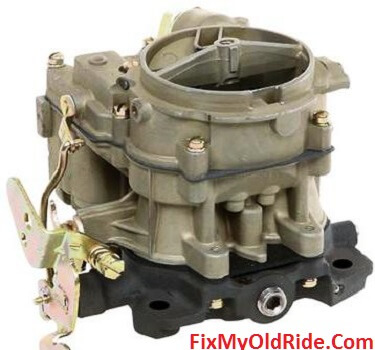
If this isn't right for you, at the bottom we've added a section about buying a high quality rebuilt Rochester carburetor found on General Motors cars.
 Rochester Two Barrel Carburetor
Rebuilding a Carburetor is Better than Replacing It
They used carburetors on automobiles all the way up until 1987. Unfortunately, the carburetor itself is susceptible to some normal wear and tear.
The internal parts and gaskets can deteriorate and cause multiple problems. There’s also some moving parts inside like the float and the needle and seat.
These can also cause some common problems with the way the engine starts and runs.
In addition, the gas that sits in the fuel bowl can deteriorate and start to varnish parts inside the carburetor.
Some replacement carburetors cost $400 to $600. However, that isn't the main reason for overhauling the existing part.
The fact of the matter is the factory selected the carburetor that would best complement the automobile, transmission and engine selection.
Meaning this carburetor was specifically chosen by engineers that built the automobile.
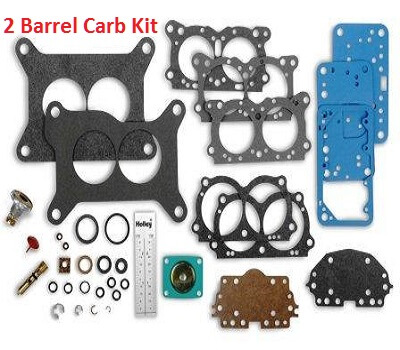
 2 Barrel Carburetor Overhaul Kit
Dissembling and Inspection of the Carburetor
Now that we discussed the reasons to rebuild the carburetor that came with the car or truck, let's talk about what's involved.
Removal of the carburetor is a relatively simple operation with removal of four easy to reach bolts. It's also necessary to disconnect the fuel line, carburetor linkage and any vacuum lines.
I recommend snapping a picture before you start removing anything so when it's time to reassemble you know where everything belongs.
The standard carburetor overhaul kit comes with all of the seals and gaskets required to perform the operation.
Since these kits only include a handful of inexpensive parts the entire box shouldn't cost more than $50.
Carburetors found on domestic automobiles are held together with long screws that thread into the base plate. Removal of all the screws allows the carburetor to come apart into three sections.
Once you pull the top off, which is called the air horn, you'll see down inside the fuel bowl. This is where the float and the needle and seat are located. The operation of these components is very similar to a household toilet.
The fuel comes into the bowl and the float level rises, which pushes down on the needle and closes off additional fuel flow. As the level decreases in the bowl, the needle rises up from the seat and allows the bowl to refill.
Common Internal Carburetor Problems
One of the most common carburetor problems is when the unit dumps too much fuel into the intake manifold. This can happen for several reasons.
However, the float and the needle that turns off the fuel flow are the most common malfunctions. Plastic and metal floats can develop leaks that make them sink in the fuel bowl and therefore allow too much fuel to enter.
You can verify if the float is good by submerging it in a bowl of water and making sure that it floats on the top surface of the water. The other common issue is when the needle wears out.
They make the tip of the needle from a rubber or a silicone substance. This can dry rot or deteriorate and allow fuel to leak past as it attempts to close off additional gas from flowing into the bowl.
Another issue that will cause fuel to dump down the throat of the carburetor is an incorrect fuel float setting. Your carburetor overhaul kit will include a measuring stick to verify the float setting.
This reading is then compared to the factory specification that’s listed in the overhaul kit's instruction manual.
To correct the float settings you simply bend the metal arm between the float and the needle until you achieve the proper settings.
Although problems with the seat are less common, they are still possible. The seat the needle rides in is made out of brass.
Even if it looks good it’s recommended to replace the seat with the new one provided in the kit. We consider the needle and seat as a set designed to work together.
Finally on the subject of common internal carburetor problems is a situation where you have an engine hesitation from a worn out accelerator pump.
Unlike the situation discussed above where we talk about too much fuel, this is a situation where there isn’t enough. When you move the throttle lever, the accelerator pump is driven down into a reservoir of fuel.
This pushes additional gas into the throat of the carburetor. The rubber cup on the accelerator pump wears out over time and becomes inefficient at supplying this extra juice. A high quality overhaul kit will always include a new accelerator pump.
Reassembling and Making Bench Adjustments
Before you reassemble the three sections of the carburetor you want to make sure all the old gaskets are completely removed.
In addition, take some time to clean the old fuel varnish off of the carburetor parts. When you put the pieces back together the air horn will go on last.
On some models the spring-loaded accelerator pump will push up on the gasket preventing it from laying flat. Finally, make sure the gasket is in the right place as you set the air horn down.
Here is an important tip when torquing the long screws that hold the three sections together. You want to start from the inboard screws and work your way out in a spoke pattern. This flattens the internal gaskets from the center outward.
I usually lightly torque all the screws and then start again from the center to reach the final tightness.
Remember, don’t over tighten the assembly screws because they thread into an aluminum base plate.
If you’re worried about them backing out from vibration you can apply a spot of thread locking compound. Now we can set The mixture adjustment screws in the base plate so the engine will start and run.
We call this the bench adjustment. Although certain manufacturers will have different procedures, most use a two full turns out from the stop, bench adjustment.
This is when you lightly seat the mixture screw all the way in the clockwise direction and then back out that adjuster two full turns counterclockwise. We make the final adjustments with the engine running and we’ll explain this procedure below.
Replacing Carburetor Fuel Filters
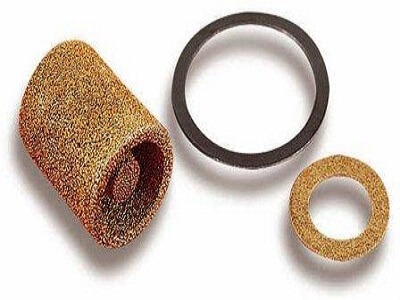
 Stone Type Fuel Filter
I talked about the symptoms of clogged fuel filters on fuel injected automobiles in a previous article. A fuel filter on a carburetor equipped vehicle is even more susceptible to these symptoms.
Fuel injected vehicles have a working pressure from 40 to 65 psi. A vehicle with a mechanical fuel pump will only produce about six psi of fuel pressure. This gives us less force to push gas through a clogged filter.
In addition, carburetor mounted fuel filters provide less surface area of filtration when compared to a fuel injected cartridge filter.
My final thought on fuel filters for carburetor equipped vehicles, is you should get into the habit of replacing them twice a year. Not only do we have less surface area and fuel pressure, but these older vehicles have had a longer time to accumulate debris in the fuel tank.
If you put these circumstances together, a carbureted automobile is much more susceptible to engine performance problems caused by a clogged filter.
Final Adjustments after You Rebuild a Carburetor
With two full turns out on the mixture screws as described in the bench adjustments section above the car should start and run decent after overhauling the carburetor.
Now it's time to make our final adjustments to these mixture screws. There are two inexpensive tools that make this adjustment a lot more scientific. You need to know the engine RPM with the use of a tachometer or dwell meter.
We also want to know the engine vacuum reading by using a vacuum gauge installed on the hose running to the brake booster. However, if you've been around engines long enough, you might be able to perform this adjustment by ear.
After the engine is warm and idling we back out on the mixture screws until the engine idle stops increasing and we achieve a maximum vacuum reading. At this precise point I go back in a quarter turn on each screw.
Engine vacuum will vary depending on your compression ratio. With that said, I shoot for an RPM of around 750 at idle with a vacuum reading on the test gauge of 17 to 20 inches of mercury.
Remember we set final idle speed from the separate idle adjustment screw where the throttle linkage contacts the base plate idle stop.
Additional Resources for Carburetor Problems
The easiest way to search down an overhaul kit is to get the part number off your carburetor. These are located on either the base plate or the middle section. On GM vehicles it’s a seven or eight digit number.
Searching down the part number followed by the keywords, rebuild a carburetor overhaul kit, will often take you exactly where you need to get the parts.
If you're having trouble you can visit carburetion.com and see where to find the part number on your model. As a final piece of advice on the rebuild a carburetor subject, I recommend staying away from kits that claim universal fit.
These come with a ton of things you won't use and therefore aren't cost-effective. It’s even a little confusing when you’re finished and you see a pile of things you didn’t use.
For those that would rather purchase a rebuilt carburetor ready to install there are a few companies that specialize in General Motors and other popular model cars.
Although this is the more expensive way to go you really can't beat having an expert do all the work for you.
Many of these companies offer a mail order service where they overhaul the original equipment carburetor for you. This allows you to keep the factory installed parts and maintain the value of your classic ride.
Author bio : Mark is a retired ASE certified master technician, Chevrolet Professional Service Council member and the founder of FixMyOldRide.com. Watch the video on the about Mark the mechanic page to see his credentials. Mark hand writes all of the articles on FixMyOldRide.com unless indicated otherwise.