Toyota Vacuum Switch Valve
Toyota cars and trucks are extremely reliable. With that said, the models from the mid-90s through early 2000's have their share of hard to resolve emission system codes.
Although the Toyota vacuum switch valve remains the most likely culprit it's not the only possible cause. Any problem in the evaporative emission system might trigger a diagnostic trouble code in the P0440 range.
Quick Link: New VSV (Vacuum Switching Valve) for popular Toyota models.
However, when you set three trouble codes in this range, the odds now strengthen the possibility of a failed Toyota vacuum switch valve. In other words, if you set a P0440, P0441 and a P0446, at the same time, you need to head directly to the canister assembly.
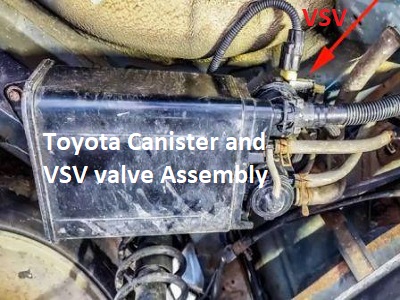
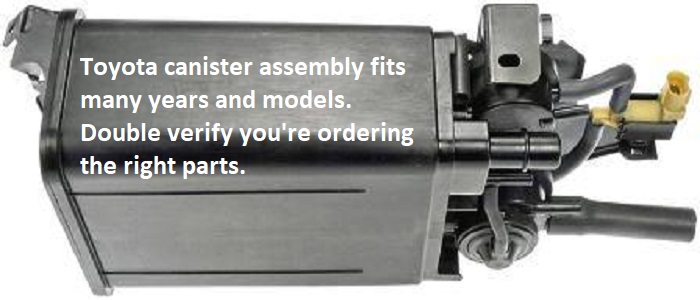
They mount the vacuum switch valve on the front side of the canister. Then they install the assembly underneath the car back by the fuel tank and over the rear suspension.
Yes, this makes the job difficult for the driveway warrior as having the vehicle up on the hoist turns the operation into a much simpler task. However, with a few tricks we can perform these repairs and diagnostic tests while the car rests safely on the ground, in park, the wheels chocked and the parking brake set.
 Toyota VSV Location Diagram
In this article we'll talk about diagnosing, testing and replacement of failed evaporative emission system components.
Often when consumers set these fuel vapor leak codes they want to replace the gas cap. However, when you're Toyota throws a check engine light code in this area, there's a good chance you’ll need to replace more than just the fuel cap.
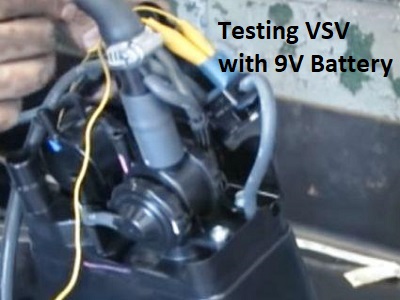
In addition, we'll talk about an easy test you can perform with a 9 V battery and 2 jumper wires. Although it’s common for the Toyota vacuum switch valve to fail because of its harsh mounting location, it’s not the only problem area in this aging emissions system.
Toyota Fuel Canister Problems
As we've learned from previous articles about canister purge problems, the cheap plastic parts the manufacturers throw on these automobiles for the sake of compliance, often lacks the quality for the long haul.
Before we move on to the diagnosis and repair section let's talk about the second and first design canisters installed on Toyota cars and trucks in the late 90s and the first year of the 2000 decade. Both designs find themselves exposed to extreme vibration and temperature changes.
Unfortunately, the active carbon inside the canister deteriorates and starts to break apart. This becomes more common on first design fuel canister units. Little fragments or chips of carbon work their way down into the vacuum switch valve.
 Toyota Vacuum Switch Valve Testing
This prevents smooth operation and proper sealing of the valve or a leaking situation. The malfunctioning valves inability to close can cause the computer to set small vapor leak codes.
In addition, if you just replace the valve and the carbon is falling apart inside the canister it will just ruin the new part. The best way to determine if the canister needs replacing is to pull the vacuum switch valve and its connecting vacuum lines off of the canister.
Then tap the valve and the vacuum lines on a white sheet of paper and see if carbon dust collects on the paper. If the answer is yes, you should replace the fuel vapor canister. This drives up your cost of parts, but can save you the headaches of repeat failure.
I wanted to stress this point, because I see people talking about what they believe are batches of bad parts. Although this might be the case in isolated incidents of junk replacement parts, it's actually more likely that a bad canister is destroying the new vacuum switch valves.
Toyota Vacuum Switch Valve Testing
I can't take credit for this quick test with a 9 V battery as a coworker showed me this cool little trick. The Toyota vacuum switch valve is a simple on and off device that diverts manifold vacuum to the canister as needed.
The switch is either on or off and activated by the computer. You can disconnect the electrical connector and connect a 9 V battery to the terminal blades as shown in the image on this page. As you connect the jumper wire to the last terminal of the 9 V battery you should be able to feel and hear the switch snap closed.
Although this switch operates on 12 V the 9 V battery is just enough to activate the switch fully. With that said, you do want to make sure that you use a fresh test battery. If the switch fails to activate or make an audible snapping sound the part needs replacing.
If the valve is clicking, it's time to test if the valve is actually switching the vacuum from one port to another. In other words, vacuum is supplied to the valve at all times.
When the computer wants to remove vapor from the canister they channel the fuel vapor to the intake manifold. They accomplish this by opening the vacuum switching valve.
The easiest way to test the proper operation is with the use of a vacuum pump. A hand operated vacuum pump to be exact. With the canister removed from the vehicle you can actually apply vacuum to one side of the switch and then activate it with a 9 V battery as discussed above.
If the switch is working properly, you'll see the vacuum gauge on the
hand pump drop to zero when the valve opens. In other words, the switch
should hold 30 psi of vacuum, without leaking down, until the switch
operates and then it should drop to zero.
Update: after
performing a few of these repairs and some additional research it's
highly recommended to replace any early model or first design Toyota
fuel vapor canister.
The 1999 model year became the last year the first design canister found its way into Toyota Corolla and Camry automobiles. Therefore, it remains more likely that automobiles from the 2000 model year and newer will get away with just replacing the Toyota vacuum switch valve.
Diagnosing Toyota Small Fuel Vapor Leak Problems
Unfortunately, the onboard fuel vapor leak detection system remains somewhat of a weak link on cars and trucks from the late 90s through the mid-2000 model years. For this reason, it might not be the vacuum switch valve that’s causing you to set these diagnostic trouble codes.
This emission system has vacuum lines, electrical switches, wiring harnesses and solenoids that run from the engine compartment to the gas tank. This covers a lot of ground and leaves a lot of area open for problems to develop.
When an automobile sets, diagnostic trouble codes in the P0440 range it's an indication of a leak or malfunction somewhere in this vast system. Automotive mechanics and the Toyota dealership often use special tools and equipment for diagnosis.
One of the most popular diagnostic tools for the system remains the smoke machine. Since the diagnostic trouble codes indicate small leaks, mechanics pump dense smoke throughout the system. This procedure locates the small hard to find problems as the smoke escapes from leaking areas.
I mention this because the Toyota vacuum switching valve is not the only possible cause of your problems. However, let me restate this. If you set all three of these diagnostic trouble codes, P0440, P0441 and P0446 start your testing at the canister mounted back by the fuel tank.
Removing the Toyota Fuel Vapor Canister
The exact removal procedure for the fuel vapor canister on Toyota cars and trucks varies between year and models. Here is of video that shows canister removal procedure for a common model. With that said, Toyota did a good job of tucking the plastic assembly up and over the rear suspension.
Fortunately the valve is accessible without removing the canister. Nevertheless, the best way to handle diagnosing and testing as mentioned above, is to remove the canister assembly and do so on the bench.
This allows you to gently smack the canister around and see if any charcoal chips fall out of the hoses. If you see signs of charcoal dust or chips you'll have to replace the canister assembly. If you're looking to avoid a repeat failure then blow out all of the canister purge lines from the engine compartment back to the fuel tank.

As we mentioned in the beginning, this job is much easier to accomplish when the vehicle is raised on a hoist. With that said, taking loose the rear exhaust hanger and letting the muffler and tailpipe hang down a few inches (support it with a jack stand) provides you with the extra space you need to fish out the canister assembly after you take it loose.
My two pieces of advice is to make sure you’re wearing full safety glasses or a face shield. A lot of debris and possibly carbon dust collects around the fuel vapor canister area. In addition, give the exhaust system bolts a good soaking in a liquid wrench or equivalent type product 20 minutes before you try to remove them.
We filed this common Toyota check engine light problem article in our car computer and sensor problems reference section. If you're looking for more information about this website visit the homepage.
Author bio : Mark is a retired ASE certified master technician, Chevrolet Professional Service Council member and the founder of FixMyOldRide.com. Watch the video on the about Mark the mechanic page to see his credentials. Mark hand writes all of the articles on FixMyOldRide.com unless indicated otherwise.