Dodge Charger Front End Noise
The Dodge Charger front end noise can drive you crazy with its variety of creaking, clicking and popping noises.
Unfortunately, there are a lot of parts in this front end configuration capable of causing these exact noises over bumps and while turning.
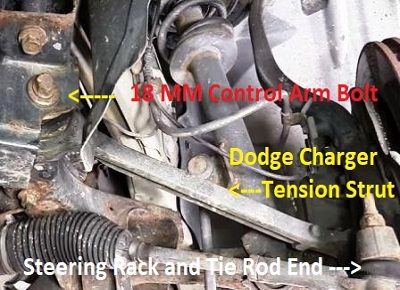
With that said, the part that mechanics look at first is the tension strut. The wheel side attaches to the lower part of the spindle, next to the lower ball joint assembly.
The other side of the tension strut attaches to the sub frame using an 18 mm bolt with a 21 mm lock nut on the other side.
I don't know if this is your exact problem, but I can tell you that it’s the first part I inspect while checking out the entire front end of the automobile.
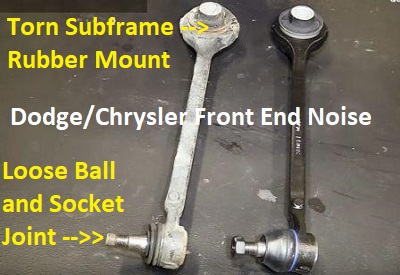
The Dodge Charger front end noise can make a creaking, groaning, banging and popping sound if the rubber mount that attaches to the sub frame tears.
When the ball and socket joint fails on the tension strut you get more of a metal to metal clicking or tapping sound from the front end over bumps and when hitting potholes.
The good news is with the amount of vehicles on the road that require replacement parts we’re starting to see aftermarket supplier’s step up to the plate and offer decent parts at fair prices.
 Chrysler/Dodge Control Arm Tension Strut
A couple of years ago this was a part you could only purchase at the dealership for top dollar. In this article we'll talk about a few of the tricks involved in replacing this component.
As an example, when I watched a few YouTube videos about replacing the part I witnessed a confusing array of methods to disconnect the ball and socket joint from the spindle on Chrysler and Dodge cars.
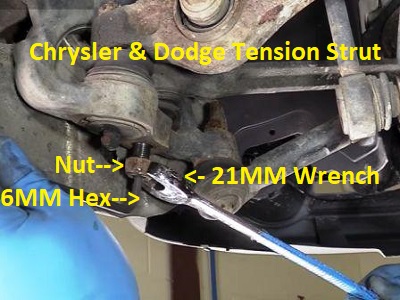
There is no reason to fight with this thing because Chrysler put a 6 mm hex recess in the threaded portion of the part. In addition, the new part comes with a new nut.
This means you can hit the old nut with a hammer and not worry about reusing it. In other words, it would be nice to have a pickle fork separating tool used by mechanics for front end work, but this is not completely necessary.
Symptoms of Dodge Tension Strut Failure
Let's talk about properly diagnosing a defective Dodge or Chrysler tension strut assembly. Unfortunately, the tension strut part can fail on both ends.
Let's talk about the rubber bushing side of the part where it attaches to the sub frame assembly first and the associated symptoms. The most common issue is when the rubber mount starts to dry rot and deteriorates.
When it fails, it can tear or separate from the metal part of the tension strut. As the part starts to go it often makes a creaking sound as the front suspension rises and falls during normal operation.
However, when the part completely separates, the creaking and groaning sound turns into a thumping and banging noise. When you're driving it sounds like the call is falling apart.
 Tension Strut Dodge and Chrysler
The deterioration of this part remains something that mechanics see often with heavy rubber engine mounts and other flexible components meant to isolate automotive sounds from the passenger compartment.
When they fail, drivers complain about noise and vibration. Now let's talk about the ball and socket side of the Dodge Charger tension strut. When the joint starts to wear you develop play in the ball and socket parts themselves.
This minor up-and-down movement between the two heavy metal parts generates a clicking or popping sound. The noise gets worse over bumps, around turns and when contacting potholes or road imperfections.
Diagnosing Dodge Charger Front End Noise
When diagnosing Dodge Charger front end noise we must isolate the bad components from the good ones.
On the rubber mount side that attaches to the sub frame we can actually see with our own eyes that the rubber is deteriorated, torn or completely missing.
After the rubber starts to break loose the movement of the control arm shreds and discards the rubber. This damage is easy to see with the naked eye.
Although it's possible for both the left and right sides to fail at the same time it doesn't usually happen that way.
In other words you can visually inspect the rubber mount and then look at the other side to compare them.
If the rubber control arm sub frame part looks good, it's time to move on to the ball and socket joint out towards the spindle or wheel side of the tension strut.
A lot of mechanics will diagnose this ball and socket joint with the vehicle hoisted up in the air. Unfortunately, the best way to diagnose a defective ball and socket joint is to check the play in the socket when the front end part is loaded.
This simply means that the weight of the vehicle is on the component as it would be during normal operation. For professional mechanics, they often slide a high boy jack stand under the control arm to load the tension strut.
If I perform this operation in the driveway at home I'll pull the wheel off and support the lower control arm with a standard jack stand. When we load the part, you can grab and shake it too see if you detect any deflection or movement in the ball and socket joint.
You can also use a large screwdriver or pry bar. The take away here is if the suspension joint is loose where it attaches to the spindle you’ll see movement. Play in this location means that the part has failed.
Replacing Dodge and Chrysler Tension Struts
Do-it-yourself mechanics with some experience can tackle this repair, but they often struggle with separating the ball and socket side from the spindle assembly.
Professional mechanics take care of this in about two seconds with an air powered hammer with a pickle fork bit. You can also purchase universal pickle forks used in a variety of front end repairs that you strike with a standard sledgehammer.
Specialized front end tools are nice to have around, but not needed for this exact repair. However, I see people getting into trouble when they start swinging their carpenter hammer at an automobile.
The reason that car mechanics use a sledgehammer is the weight of the head. Striking the spindle hard with a sledgehammer can also knock loose the tapered post.
There are a few other methods that mechanics can use. A favorite method among driveway warriors is to unscrew the nut until it's flush with the threaded post.
Then you can use your sledgehammer to drive up on the old nut and post. They also make an inexpensive special press tool that you can often borrow from an auto parts store.
 Chrysler Control Arm Strut Removal
You will certainly damage the nut, but a new nut comes with the new parts. Unfortunately, driveway mechanics often run into a problem where they attempt to remove the nut, but the post just turns. Surprisingly, Chrysler has your back on this problem.
They inserted a 6 mm hex opening in the end of the threaded post on the tension strut. This means you can use an Allen wrench to hold the post while you remove the nut.
On the rubber mount side that attaches to the vehicle subframe, it’s a simple matter of removing the 18 mm bolt and the 21 mm lock nut.
Since it's a locking nut it's nice to use a ratchet on one side and a box end wrench on the other. Note that after you pull the bolt out that you might need a decent sized pry bar to dislodge the Chrysler tension strut from the sub frame mounting area.
With the part replaced you’re ready for a road test. Hopefully, the Dodge Charger front end noise is gone for good.
We filed this article in the miscellaneous car repair section of the Fix my old ride website. In this area you'll find hard to classify car problems like noise and vibration diagnosis and repair.
Author bio : Mark is a retired ASE certified master technician, Chevrolet Professional Service Council member and the founder of FixMyOldRide.com. Watch the video on the about Mark the mechanic page to see his credentials. Mark hand writes all of the articles on FixMyOldRide.com unless indicated otherwise.